Showing posts with label Baking 101. Show all posts

28 April 2013

Boiled Icing (Italian Meringue)

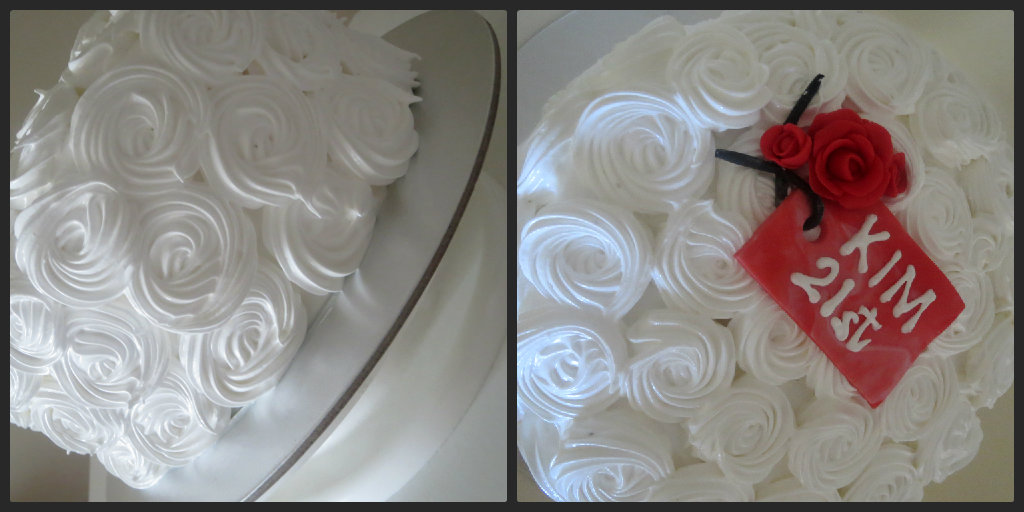
Due to hot weather, boiled icing is the most common icing used for birthday or wedding cakes in the Philippines. Despite the popularity of fondant icing, some people still prefer boiled icing because it is more stable during the hot weather, lighter and cheaper.

Boiled Icing is also known as Italian Meringue. Meringue is basically whipped egg whites sweetened with sugar. There are different kinds of meringues and the differences lie in the method of preparation.
Sugar in Italian meringue is cooked at certain temperature while French is the easiest for no sugar cooking is required. Swiss meringue, on the other hand, is made by warming the egg whites and sugar together and beaten until double in volume.

Some pointers in preparing meringues:

1. Make sure that the egg whites are yolk free and the mixing bowl and mixer whisk are grease free.
It will affect the foaming property of your egg whites.

2. Egg whites whip best if at room temperature.

3. Cream of tartar helps in making your egg whites stable.

Recipe for Italian Meringue:

250 g sugar
1/3 c water
pinch of cream of tartar
4 egg whites

Procedure:

1. Heat sugar and water in saucepan. Using a candy thermometer, cook sugar until it reaches 220 deg F (105 deg C). At this stage, start beating your egg whites with cream of tartar at medium speed until soft peaks.


2. Once the syrup reaches 240 to 243 deg F* (117 deg C) firm ball stage, turn off fire.
*better to turn off fire at 240 deg F because it continues to cook, temperature increases by few degrees sometimes.

3. Adjust the mixer speed to low and slowly pour the hot syrup in thin stream.

4. Put back to medium speed once all the syrup has been poured. Beat until the meringue has cooled down and firm peaks form.


5. Cover bowl with damp cloth while icing is not in use. This is to prevent drying.
6. Desired colour can be achieved by adding few drops of food colour.


17 April 2013

See the difference!

Here's something interesting I want to share with you guys. Getting different outputs using the same batch of batter but using different pans.

I used two different Madeleine pans, silicone and a tin. As I've mentioned before, tins are better conductor of heat, hence, colour is better and it peaks higher. It also took few minutes longer to bake those in the silicone tray. You'll find it quite difficult to take out a silicone tray from the oven so it has to be placed on top of a cookie sheet. Although, there are advantages in using a silicone tray, like it's easier to clean , it doesn't stick and unmolding the finished product is quick. 

I guess, it all depends on what you'll be baking and of course, a case of personal preference.


Baked on silicone tray (First row from right); Baked on Tin (Second row)

31 March 2013

C is for Cookie or B is for Bicky...


This is my favorite chocolate chip cookie recipe from one of the best pastry chefs, Jacques Torres. I have tried and tested several chocolate chip cookie recipes and this one, so far, is the best, for I prefer my cookie  soft and slightly chewy. Here in Australia, most of the cookies sold in the shops are not the American type. They're crunchy and the biscuit type, hence, they call it "bicky".

The recipe and video can be found in this link  . I used less chocolate chips and I didn't use an ice cream scoop which explains the edges, not smooth.

NOTES and TIPS on making cookies:

  • The presence of bread flour in cookie recipes is responsible for its chewy texture.
  • Should you desire for a soft cookie, bake just until the side or edge of the cookie is brown. If the recipe says 10 mins. baking time, reduce the time to 8-9 mins.  If a biscuit type of cookie is preferred, bake it a little longer, a minute or two.
  • Carry Over cooking. Once the cookies are pulled out from the oven, leave the cookies in the tray for they are still "baking/cooking" in the process.  Don't worry if the center is a bit soft for the heat will continue to "bake" the cookie until the temperature goes down. 
  • For convenience, cookie dough can be rolled into tiny logs and kept in the freezer (mostly what we do in catering functions). Slightly thaw in the fridge, enough for you to slice them to 1/4 to 1/2 inch thickness, and bake. For uniform size and the home made cookie look, use an ice cream scoop. 


  • Chilled dough are better to work with. You won't have a very flat cookie if cookie dough is chilled. It takes a while for a cold cookie dough to expand in size or sideways inside the oven compared to a soft cookie dough.
  • Baking times vary depending on the size of your cookies.
  • Lining your cookie sheet with baking paper is the convenient way of baking cookies as you don't need to wash your flat sheets after. In the absence of paper, a slightly greased and floured tray is another option. We dust the greased tray with flour to control the spread of our cookies. 
  • If your cookie tray is thin, you can double your tray so it won't burn quickly.
Cookies are easy to make and you can get your kids involved. It is always part of my afternoon tea when friends drop by to visit.


08 March 2013

Green Tea Chiffon Cake with Azuki Bean

This is a very light cake and not so fattening. The union of green tea flavour and sweetened azuki is delicious. Azuki is a reddish brown type of bean. Canned sweetened azuki can be bought in Japanese stores. Otherwise, you can boil some red beans and cook it in sugar syrup. 

For beginners, you might find it a bit complicated because the mixing method is different. Don't worry. Take it as a challenge. Chiffon cake is the first type of cake I learned to bake. As they say, practice makes perfect.

Green Tea Chiffon Cake with Azuki Bean
Ingredients:
A.
250 g cake flour
200 g white sugar
2 1/2 tsp baking powder
1/2 Tbsp green tea powder *

(*can be omitted and replaced with vanilla essence, which makes it a basic vanilla chiffon cake)

B.
125 ml oil
7 egg yolks
190 ml water

C.
8 eggwhites
1/2 tsp cream of tartar
125 g sugar

D.
1 can sweetened azuki
600 ml thickened cream or all purpose cream
3-4 Tbsp icing sugar
1-2 tsp green tea powder
chocolate bar, for garnish

Procedure:
1. Preheat oven to 350 F or 170 deg C.
2. Mix dry ingredients in a bowl  (A); Use a whisk until green tea powder is incorporated well.
3. Make a well and add all ingredients in set B.
4. Using a wire whisk, blend until lump free.
5. On a separate mixing bowl, add egg whites and cream of tartar.
6. Beat at medium high speed and gradually add sugar. Beat until it forms into stiff peaks. (It will look shiny at this stage. It is perfectly fine to stop once in a while and check whether it forms into peaks. Lift the beater and check if peaks are forming. Another test, tilt your bowl, the egg whites shouldn't slide. Careful not to over beat because it will liquefy again.) 

Beating egg whites.


7. Gently fold batter into the egg whites. For first timers, you may want to follow these steps: 

  • Get 1/3 of the beaten egg whites and slightly mix into the batter. (This is being done to prevent all the batter from settling down at the bottom of the egg whites. Remember, the batter is heavier than the egg whites.)
  • Now pour the batter into the egg whites and gently cut and fold. You can use a rubber spatula or scraper. Mix until blended together. Do not over mix for it may deflate the bubbles in your egg whites. 

8. Pour in ungreased pan and bake for 45 to 60 minutes or until done. (I normally put baking paper at the bottom for convenience. Never put paper on the sides of the baking pan, otherwise, your cake will have a funny shape. It will form a waistline on the sides or the cake will look like a tree trunk.)

9. Invert the pan immediately in a cooling rack after taking the cake out of the oven. Cool completely before removing from the pan. A metal spatula can be glided lightly to loosen the sides of the cake. It is best to chill the cake before finishing with cream.

10. To finish cake:


      A. Prepare the green tea cream

  • Set aside 1/4 c of cream and dissolve the green tea powder.
  • Pour the green tea cream into the rest of the cream in a bowl and whip until stiff peaks (Do not over beat, you might end up having butter).
  • Add icing sugar and mix.

      B. Assembly

  • Slice the cake in half to create two layers.
  • Get small amount of whipped green tea cream and mix the azuki.
  • Spread it into the cake evenly. Put the other half cake on top.
  • Cover the entire cake with whipped green tea cream by using a metal spatula.
  • Finish with grated chocolate bar and dust with green tea powder.
Notes on beating egg whites:
  • It is best to use a stainless or glass bowl, which is clean and oil streak free. Never use a plastic bowl for egg whites don't beat well or an aluminum bowl, your egg whites will turn grey in color.
  • Egg whites don't whip best if cold. Make sure it is in room temperature and there are no traces of yolks in your egg whites.
  • Cream of tartar is egg white stabilizer. In its absence, few drops of lemon juice will do.

Happy Baking! 


27 January 2013

Basic Brownie Recipe

It's one of my favourite slices! Easy to prepare and they have long shelf life. Perfect for potlucks or as a gift. Brownies is one of the first few recipes I learned when I was in grade school. You can't go wrong on this, promise! Brownies are either cakey or fudgy. The recipe I'll be sharing with you today is fudgy and a bit chewy. Don't expect a great height on your slices.

I prefer using Dutch processed cocoa powder whenever I make brownies because it tastes better and the colour looks more attractive, in my opinion. Some natural cocoa powder renders a light or pale brown finish despite the good cocoa taste. I guess it also depends on the brand. Sometimes high quality cocoa powder being used commercially can't be sourced from local stores.

In  my knowledge, there are two types of cocoa powder in the supermarket, natural  and dutch processed cocoa powder. Cocoa powder, by nature, is acidic. Hence, if you've noticed, recipes calling for natural cocoa powder are paired with baking soda as a chemical leavener. It is because the chemical reaction happens with the presence of acid. Dutch processed, on the other hand, had the acids neutralized through alkali treatment. Baking soda will not work if you used dutch processed cocoa unless there are other ingredients in your recipe which are acidic, such as brown sugar or vinegar.

Now, go and get your cocoa! Happy baking! 

BROWNIES

3/4    c melted butter
1 1/2 c sugar
1/2    c Dutch processed cocoa powder
2 pcs.  eggs
1      c flour
1 1/2 t  baking powder
Optional topping: chopped nuts (almond,pecan or walnut)

Procedure:

  • Pre-heat oven at 350 F or 170 C.
  • In a bowl, mix butter, cocoa and sugar with a wooden spoon.
  • Add eggs.
  • Then, the remaining dry ingredients. Mix until lump free.
  • Pour in a 7x7 or 8x8 square pan lined with foil.
  • Bake for 30 mins or until done.
Notes:


  • Photo above shows how to have a neat lining of aluminum foil in your square pan. 
  • Cool completely before slicing. Chill before slicing so you'll have cleaner edges.
  • Baked brownies can be kept in the freezer and thaw few hours before serving
P.S. If you plan to try this recipe, kindly let me know how it turned out. I would be very delighted to hear your comments. Maybe we can post photos of your brownies. 


23 January 2013

To sift or Not to sift?

We sift dry ingredients for few reasons.

  • First, to remove lumps. Flour, baking powder,baking soda, sugar and other dry ingredients are normally prone to lumping. If not properly sifted, we'll end up having tiny lumps in our cake. Worst, if chemical leavener (e.g. baking powder)was not sifted, your cake might rise uneven due to its uneven distribution in the batter or when eaten, you'll have that funny soapy taste. 
  • Second, to blend dry ingredients into a homogeneous mixture. There are recipes which are so delicate that we can't overmix the batter. Hence, sifting ingredients together beforehand is the only way to go. 
  •  Lastly, we sift to remove foreign objects. In my baking experience in the Philippines, flour can easily have weevils. The flour is either old or an infestation might have taken place, perhaps from the milling plant, supermarket or even from our cupboards. We can also blame the warm and humid weather for weevils for they thrive on those conditions.

Technically speaking, we should sift. In the years that I've spent in the professional kitchen, where time is always of essence and the amount of baked products being produced are huge, sifting is rarely done. But with the quick turn over of ingredients, supply is always fresh, lumping or weevils is never an issue. Again, if the recipe procedure calls for it, then we should follow.

At home, generally, I don't, as the flour here in Australia isn't lumpy or some are presifted. The trick is (lazy way? ha.ha.), I mix my dry ingredients in a bowl & use my wire whisk to blend them together. For fuzzy recipes, I do. With the busy lifestyle here abroad, I can't afford to waste time. I'd rather sift than repeat or pass the batter into a sieve.

Just a reminder, sifted dry ingredient weighs differently from an unsifted one :D.

16 January 2013

What's in a flour?

I only knew three major kinds of flour before, Plain or All Purpose Flour, Cake Flour and Bread Flour. When I went to the culinary school, pastry flour was added to my list. Now that I work in a flour milling company, my list got longer. For home baking, we're fine with the first three.

Here's a short description of the following:
  • Bread Flour - Technically, it has the highest protein content among the four, ranging from 12 to 14%. The higher the protein, the stronger the flour is. Protein produces gluten which is responsible for giving structure to our bread. It is the main reason why we don't use it in making cakes because we want a softer texture.
  • Plain or All Purpose Flour- The name speaks for itself. We use it for making cookies, pastries, some cakes and even breads (e.g. cinnamon rolls, which we want softer than our usual breads). We also use plain flour for cooking and to thicken our sauces. Protein content lies between 9 to 11%. 
  • Pastry Flour - Used for pie bases, biscuits or cookies and other pastries. Its protein content is between 8 to 9%. A cross between plain and cake flour. If you can't find any pastry flour in the market, you can combine plain and cake flour; 1:1 ratio.

  • Cake Flour - The weakest and has the lowest gluten. It has around 6 to 8% protein content. Cakes such as chiffon or sponge types are soft & tender, hence, we don't need a strong flour to be used in our recipe. It is whiter in color so it's easy to distinguish between a bread flour or plain flour. I had difficulty sourcing cake flour here in our supermarkets not until recently.
Ooops, I forgot, here overseas, we have self raising or self rising flour. It is flour with baking powder mixed in it.

I know, I sounded like a geek. Ha ha.

05 January 2013

Understanding your Recipe

How can we live without a recipe? Quite difficult. While it's true we can memorize a recipe or two by heart but in my case, I have a lot of favorite recipes that it's difficult not to consult my pocket notebooks. In every workplace that I've been to, I keep a small notebook. Funny, when I asked my children which stuff they would want to have when I'm gone, my eldest ask for some pieces of jewelry while my youngest asked for my recipe notebooks. 

Except for home recipes, ingredients are always measured by weight especially in the professional kitchens or bakeshops. Convenience, consistency and definitely accuracy are the main reasons. Imagine baking a big batch using a home recipe, will we measure 20 cups of flour or 8 teaspoons of baking powder? For home consumption, measuring ingredients by volume is perfectly fine.

Here in Australia, we use the metric system. Recipes from  USA use their own system of measurement. Basic units of metric system are gram, liter, meter and degree Celsius.

Please familiarize yourselves with the following abbreviations as I will be using it through out my posts:


  • c   = cup
  • t   = teaspoon
  • T  = tablespoon
  • g   = gram
  • kg = kilogram
  • L  = liter
  • ml = milliliter
This basic conversion will also come handy to you.

1 T                = 3 t
1/4 c              = 4 T
1kg                = 1000g
1 pound (lb) = 454 g

Some final words: follow your recipe, measure or weigh correctly and use the ingredients specified.
Once you fully understand how ingredients react with each other and  you're confident with your baking prowess, you can tweak or make your own recipe.


Basic Tools & Equipment

For those who haven't tried baking, I'm sure you're quite unsure where or how to start.Firstly, you need few basic tools & equipment enumerated below:


  • Oven
    • Your home oven is fine. I survived selling baked stuff every Christmas when I was a teenager using my mother's conventional gas oven. Most ovens installed in newer units here in Australia are convection ovens, which are fan forced. Remember, these are slightly hotter than the conventional ovens because of the air that is circulating inside. We normally bake 20deg lower than the prescribed temperature in the recipe. If you ask me, I prefer using the conventional oven. There are just recipes that bake well in a conventional oven than in a fan forced oven and vice versa.
  • Oven Thermometer
    • Even if you have developed a good baking skill but if your oven's temperature is incorrect, you wouldn't be happy with your finished product. It takes awhile to know your oven.  In a conventional oven, there are spots which are hottest. Normally, the sides would be hottest or the upper and lower most rack are because they are either near a heat source like the flame or heating element; or the walls of the oven. These are conductor of heat. Plus,  I don't trust an oven dial.Commercial ovens,of course, can be trusted for these are being calibrated regularly.
  • Hand Mixer/Stand Mixer
    • If you're just starting, you will survive using a hand mixer. That's how I also started. You can even do away with it because you can first practice recipes that will not require a mixer. Recipes like carrot cake, banana bread, brownies or some cookies can be mixed manually.
    • Once you're serious in baking, that's when you entertain the idea of buying a KITCHEN AID. Notice it is all in caps lock ha.ha.ha. I'm a great fan of it. I'm not being paid for this but I believe in the product. I think it's one of the best kept secrets of bakers. I remembered getting frustrated when I first made my boiled icing when I was 15. I just couldn't get the right consistency even after following the recipe religiously. On my 16th birthday, my mother bought me my first Kitchen Aid. Wow! that's when I realized it's not me, it was the mixer ha.ha.ha. Until now, my first Kitchen Aid is still working. My mother, who's 65, uses it to make muffins that she sells in our cafe.  Yes, it's a bit expensive but don't look at it as an expense. It's an investment and will go along way.
    • For commercial operations, Hobart is a good brand.

  • Measuring cups and spoons
    • There are two types of measuring cups. The nested cups are for dry ingredients while the other one is for liquid ingredients .  Not all recipes are written in cups. You'll come across recipes in grams. Soon, you'll consider having a weighing scale. I'll discuss one of these days the advantages and disadvantages of recipes in cups and grams.  

  • Bowls and cake tins
    • Plastic bowls can be used when measuring ingredients. I prefer using stainless bowls when mixing ingredients though. Aluminum bowls can react with certain ingredients or if you use a whisk to mix , don't be surprised if your batter turns greenish or grey in color due to chemical reaction. By the way, beat egg whites in a stainless bowl.  It produces better peaks than if using a plastic bowl.
    • Cake tins. I use aluminum or stainless tins instead of silicone pans because the former gives nicer color when baked and are better conductor of heat. Using the latter gives you a paler cake.You can start with the following and add other sizes or shapes as you progress:
      • Square pan for your brownies or bar recipes
      • Cookie sheet
      • 8" or 9" round pan for your cakes
      • Muffin/Cupcake tin
  • Other Tools
    • Wire whisk
    • Metal spatula
    • Rubber scraper
    • Serrated knife (to slice your cakes)
    • Wire rack to cool your cakes or cookies
    • Sieve or strainer, for sifting your dry ingredients

I hope I didn't bore you. A bit lengthy but I think it's important. Now, if you have those, you're all set to bake.